Jconsole and Tomcat 5
The latest version of Sun's JDK (5.0) includes a fantastic utility called Jconsole. This program makes use of JMX (Java Management Extensions) to let you keep tabs on your JVM's. When you pair this tool with the Tomcat servlet container, you get to peek inside what was previously a black box. You can watch (in real time or historically) exactly what the JVM that runs Tomcat is doing. And you can do it remotely from your workstation.
The only prerequisite is to have the latest JDK (1.5.0_08 as of this writing) installed on both the server and workstation. After you ensure Java is installed, here's how you set it up:
1) Open the /tomcat/bin/catalina.sh file and add the following directive:
CATALINA_OPTS="-Dcom.sun.management.jmxremote -Dcom.sun.management.jmxremote.port=8004 -Dcom.sun.management.jmxremote.authenticate=false -Dcom.sun.management.jmxremote.ssl=false"
These directives will enable JMX when the Tomcat JVM is started. It tells the daemon to listen on port 8004 and to not use SSL or authentication. (NOTE: if this server is connected to open Internet, it is best to enable SSL and authentication)
2) Start Tomcat normally. You should now see port 8004 listening for JMX connections:
# netstat -pantl|grep LISTEN | grep 8004
Proto Recv-Q Send-Q Local Address Foreign Address State PID/Program name
tcp 0 0 0.0.0.0:8004 0.0.0.0:* LISTEN 2544/java
3) From a remote Windows workstation, invoke jconsole:
Start/Run/cmd then type: C:\Documents and Settings\Jeffrey Costa>"c:\Program Files\Java\jdk1.5.0_08\bin\jconsole.exe
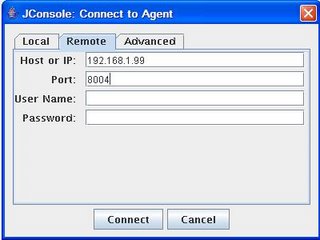
4) Once the agent connection dialog box comes up, choose the "Remote" tab, and enter the IP address of the remote machine and 8004 in the "Port" field. A username and password are not necessary here.

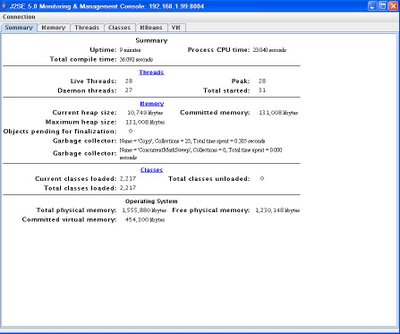
5) Jconsole will now begin showing you information about the Tomcat JVM:

The only prerequisite is to have the latest JDK (1.5.0_08 as of this writing) installed on both the server and workstation. After you ensure Java is installed, here's how you set it up:
1) Open the /tomcat/bin/catalina.sh file and add the following directive:
CATALINA_OPTS="-Dcom.sun.management.jmxremote -Dcom.sun.management.jmxremote.port=8004 -Dcom.sun.management.jmxremote.authenticate=false -Dcom.sun.management.jmxremote.ssl=false"
These directives will enable JMX when the Tomcat JVM is started. It tells the daemon to listen on port 8004 and to not use SSL or authentication. (NOTE: if this server is connected to open Internet, it is best to enable SSL and authentication)
2) Start Tomcat normally. You should now see port 8004 listening for JMX connections:
# netstat -pantl|grep LISTEN | grep 8004
Proto Recv-Q Send-Q Local Address Foreign Address State PID/Program name
tcp 0 0 0.0.0.0:8004 0.0.0.0:* LISTEN 2544/java
3) From a remote Windows workstation, invoke jconsole:
Start/Run/cmd then type: C:\Documents and Settings\Jeffrey Costa>"c:\Program Files\Java\jdk1.5.0_08\bin\jconsole.exe
4) Once the agent connection dialog box comes up, choose the "Remote" tab, and enter the IP address of the remote machine and 8004 in the "Port" field. A username and password are not necessary here.

5) Jconsole will now begin showing you information about the Tomcat JVM:

